
Getting good sound for oral history interviews can be a challenge. In an ideal world, perhaps you’d always have top-notch equipment in environments free of background noise. As Jenna has already written, even small improvements in your equipment and environment can give big benefits in the quality of your recording and your ability to reuse it later. Still, sometimes you take the interview where and when you can get it, with the equipment on hand. When it comes time to index, transcribe, and share that audio, though, volume changes and background noises can be a real hindrance. So what are some quick tricks you can learn to clean up your audio captured in the field?
This tutorial will refer to the audio editing software Audacity, because it’s free, cross-platform, and open source. However, the techniques are generally available in some way under the same name in other audio editing software like GarageBand.
The techniques for all of these tools are relatively similar in Audacity – you select a portion of the audio track where the sound issues occur (or the whole track, if it’s pervasive), and then choose the relevant tool from the Effects menu. This will bring up a window where you can set the parameters for the effect. At this point, you use your own judgment to decide how aggressively to apply the tool, aiming for audio that’s easier to understand but without significant new digital distortions introduced. Remember that Audacity has an Undo button if you’re not happy with the results, and that you should always maintain a pristine copy of the original unedited interview recording.
Noise Gates
Our rooms are full of background noise – air conditioners, computer fans, running refrigerators, our small movements and breaths. A noise gate restricts sounds below a certain volume, thus removing some of these distractions from your audio.
My preference is to use hardware which includes a built-in noise gate (or “pad”, which is technically different but can achieve a similar effect). The -10 decibel pad on my Go Mic, for example, does a stellar job stripping out the sound of the air handler in my office, and the headphone jack in the hardware lets me know the sound quality before I hit record. This is a pair of features to look for when you select recording equipment or apps.
Audacity doesn’t have a built-in noise gate, but one is available as a plugin which you can download and add to your copy of the software.
Noise Reduction
Audacity also has a noise reduction feature designed to take out “constant background sounds such as hum, whistle, whine, buzz, and “hiss”.” It works by analyzing a segment of the audio which captures the “room noise”, and then removing those frequencies from the rest of the track. It is not good at removing sporadic background sounds like a chair squeak or a radio playing in the background. (The noise gate is better at those.)
The first step in using the noise reduction tool is during the recording process. It’s a best practice to capture 3-5 seconds of the sound of the room (with both interviewer and interviewee being as silent as possible).
When you go to edit the audio, select those 3-5 seconds of audio, which contain all noise and no signal. Then choose Effect > Noise Reduction and click the Get Noise Profile button to teach Audacity what the room noise sounds like. You then select the portion of the track from which you want to remove the offending noise (or the whole track), click Effect > Noise Reduction again, and click Reduce to remove the room noise from the track. (There are settings on that window which allow you to set volume and sensitivity levels for the algorithm.)

To be honest, I’ve found it very easy to overshoot with this tool, and as a result I don’t use it very often. However, better audio engineers than I swear by it, so perhaps I haven’t spent enough time practicing with it yet.
Leveler
Let’s say you’ve taken a great interview. Your interviewee was expressive and engaged. But when you go back to listen to the audio, you notice that her expressiveness involved a lot of leaning in and speaking at full voice, and leaning back and whispering. It’s all audible, but the dynamic range is distracting. This looks like a job for the leveler!
The Leveler reduces the difference between loud and soft in your audio, with minimal settings and in ways that are suited for human speech. The options are simple – just select a Degree of leveling from “Light” to “Heaviest”, and choose a Noise Threshold to define the soft background sounds you just want left alone. There’s a Preview button, so you can hear a sample of what your settings will accomplish before you apply them.

To use the Leveller, select either an entire track of audio, or make a selection within the track. Then select Effects > Leveler, and try different degrees of leveling.
Compressor
Let’s imagine that you take an interview with your trusty recorder laying on the table, pointing toward your subject. When you listen to the interview later, your interviewee sounds fine – but your questions can just barely be heard. This looks like a job for the compressor!
The Compressor can be thought of as the more finely-tuned version of the Leveler. With tighter control over what sounds get amplified and how much, you may be able to get better results, though it will take more experimenting with different thresholds and ratios of compression.

The graph shows the original volume along the horizontal axis and the volume after compression along the vertical axis. In the example above, you can see the compression applying to sounds above 12 decibels, while softer sounds are slightly amplified but not compressed. Also note the Noise Floor setting, which serves to not amplify those softest room sounds (in this case, sounds under 40 decibels).
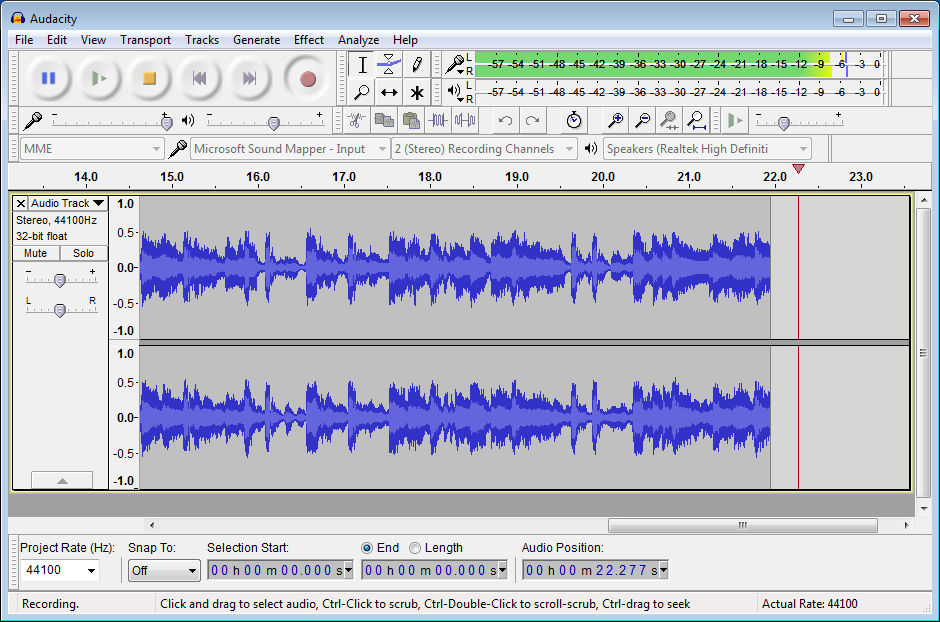
Audacity editing window image by Peter H. Sampson, CC-BY-3.0, https://commons.wikimedia.org/wiki/File:Audacity_2.1_recording.png
Audacity settings window images courtesy of the Audacity manual team, CC-BY-3.0, http://manual.audacityteam.org/index.html