

Getting Started with Audacity for Oral History
If you plan to conduct interviews for the purpose of producing oral histories, you will almost certainly require some sort of sound editing software. If advanced expensive programs and suites are beyond the scope of your project or financially out of the question, Audacity is the way to go. Audacity is a free, easy to use, open source program available for basically all operating systems. Students who may be unfamiliar with this type of software will likely encounter a minor learning curve. The purpose of this module is to provide the basic knowledge required to edit audio clips for use as oral histories with accessibility and efficiency in mind.
Playback
The basic playback functions in Audacity are pretty straightforward. In the top right of your window, you will find standard playback functions similar to those of a typical stereo: pause, play, stop, skip, skip back, and record.

Importing
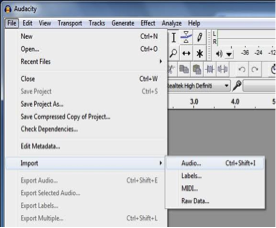
To import an audio file, you must click on File > Import > Audio and then select the sound clip you wish to import from its designated location on your computer.
Selection and Clipping
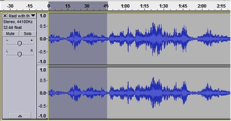
In order to remove an undesired portion of a sound clip, use the selection tool to highlight said portion, and press delete on your keyboard.
Removing Background Noise
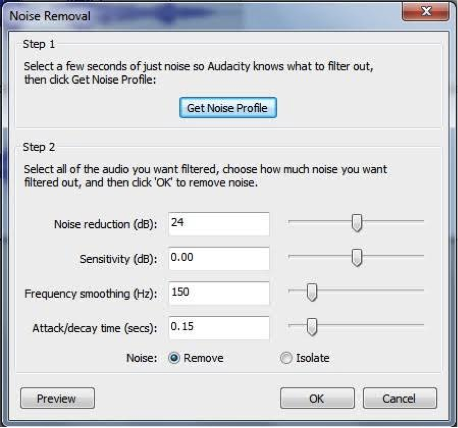
If your audio contains a lot of unwanted background noise, you will want to use the noise reduction tool. First, make sure that you have the selection tool selected. Next, use your cursor to select a portion of the audio file containing only the background noise you wish to remove/reduce. Go to Effect > Noise Reduction, and click on the Get Noise Profile button. Now, using the selection tool, highlight a portion of the audio clip in which you want to remove the background noise from. Go to Effect > Noise Reduction and click on the Preview button to ensure that the background noise has been reduced to your liking. If not, you can adjust the settings accordingly. Note that this tool is imperfect, and there may be instances in which the background noise is too prominent to be removed entirely without also rendering the interviewees voice inaudible.
Utilizing Multiple Tracks
If you intend to create a single audio file containing clips from multiple interviews, or a podcast-style project including music and sound effects, you will likely want to utilize multiple tracks. When you import additional audio files, new tracks will automatically be created. To create a new track on your own, you need to go to Tracks > Add New > Mono/Stereo. Stereo refers to an audio clip which contains two separate channels with different sounds for each channel. The top channel represents the sound that coming out of the left speaker, and the bottom channel represents the sound coming out of the right speaker. Mono refers to an audio clip with only one channel in which the same sound plays through both speakers.
Repositioning Audio
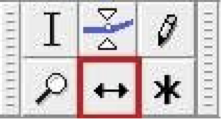
In order to reposition a sound clip, select the time shift tool and drag the sound clip to the desired position.
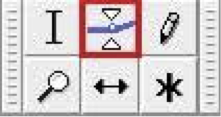
The Envelope Tool
If you want to incorporate background noise or music, the envelope tool is useful for reducing the volume of a specific section of audio. Alternatively, if you wish to have music or audio fade in or out as a transition, select the portion of audio you wish to fade, then go to Effect > Fade In or Effect > Fade Out.
Saving Your Project
Be sure to save (File > Save) frequently, as you do not want to accidentally lose your project.
Exporting Your Project
Audacity projects have their own file type (.aup), so when your project is complete, you will need to export it. To do so, go to File > Export Audio. From here, you will be able to designate where you wish to save your final project, as well as edit the metadata of your project, which is useful for when you open the project in programs like iTunes or Windows Media Player.
Additional Resources
Audacity is a dynamic program with many capabilities for sound editing. The purpose of this module is to establish fundamental functions of the program for the purpose of creating and editing oral histories. There are many tutorials available on YouTube [https://www.youtube.com/watch?v= IC3VZkfdgV8 ] and elsewhere online if you wish to further explore the programs capabilities.