Transcript synchronization is one of the key features of the Oral History Metadata Synchronizer, but in order to synchronize your transcript with OHMS you need to format it in a very specific way. If proper document formatting is not followed, OHMS will not accept your transcript. Unfortunately, it will not even give you an error message to tell you what went wrong. This can lead to long, frustrating periods of time of furiously searching through a transcript to find the error in your document’s format. Luckily for you, we have figured out how to easily and consistently format and upload transcripts through our work on the bilingual War Memories project. If you follow the steps below exactly as they are presented, you should be able to format and upload your transcript in no time. We will be using a Mac computer with Word 2011, though it should work with Windows too (except for installing the macro, more on that later). Operations specific to Japanese transcripts are colored blue.
Part 1: Formatting your Word document.
- Open the transcript in Word.
- Select all (command + A) and choose font size 10. For Japanese transcript, also select font such as “MS明朝.”
- Remove all nonspoken text except for speaker names and parenthetical inserts (like this). Nonspoken text to remove includes document title, links, timestamps, comments, page numbers, etcetera. If you leave in page numbers OHMS will not accept your document.
- Begin each section of dialogue with the speakers name followed by a colon. For example, “example name: dialogue from your interview goes here.” The first time a speaker is referenced you should use their full name. Each additional time a speaker is talking we have referred to them by their initials and a colon in English or their last name followed by a colon in Japanese. However, you may use different naming conventions as long as the speakers name is followed by a colon. If using a Japanese input source, make sure to use half space characters rather than full space characters. つまり英語の入力のように半角の「: 」を使い、全角の「: 」は使わない。
- Remove headers and footers.
- Select “Word,” then “Preferences.”

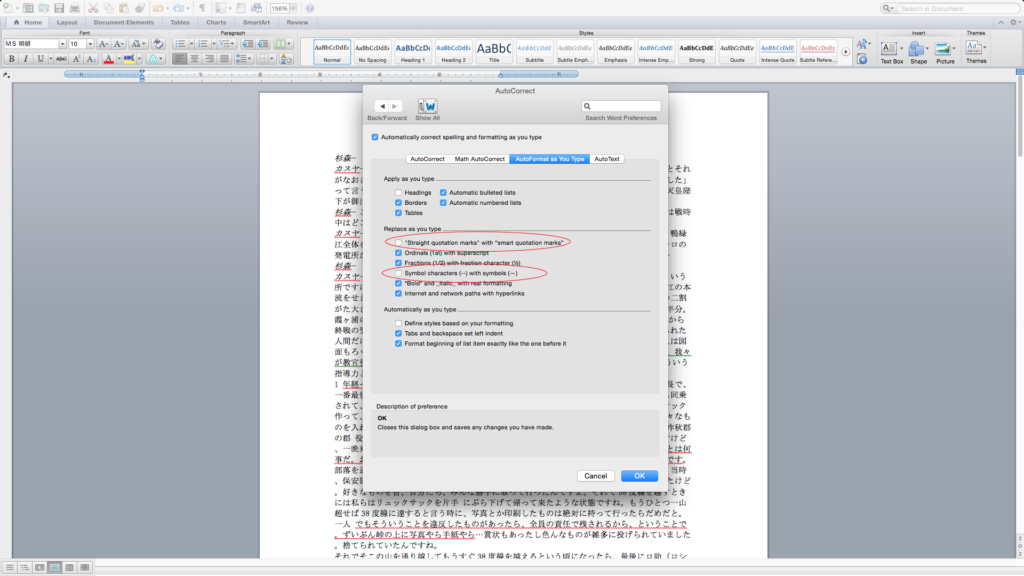
- In the new window, select “AutoCorrect” and “Auto Format as You Type,” then deselect “’Straight quotation marks’ with ‘smart quotation marks’” and “Symbol characters (–) with symbols (-).” Click “OK.” This is the only time you will have to do this step. Word will remember that you have made these your preferences. OHMS will not accept smart quotation marks or special dash characters.
- Next you want to remove all manual line breaks (if you have any). Select “Edit,” “Find,” and “Replace…”
- Choose Replace all “^b” with “(leave blank)” (do not use the quotation marks).

- Once again follow steps to replace all, this time with “^l” (as in the lower case L) and replace with “^p”.
- Download the Nunn Center OHMS transcript-preparation Macro (Microsoft Word). For instructions on how to install macros in word on Windows and for a more detailed overview of the macro click here.
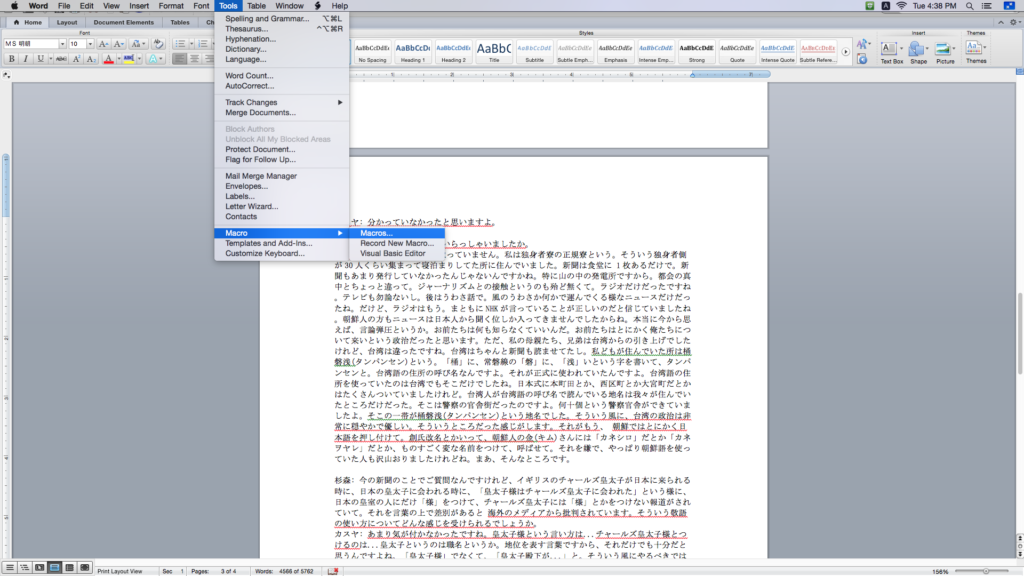
- Back in Word, click “Tools,” “Macro,” and “Visual Basic Editor.”
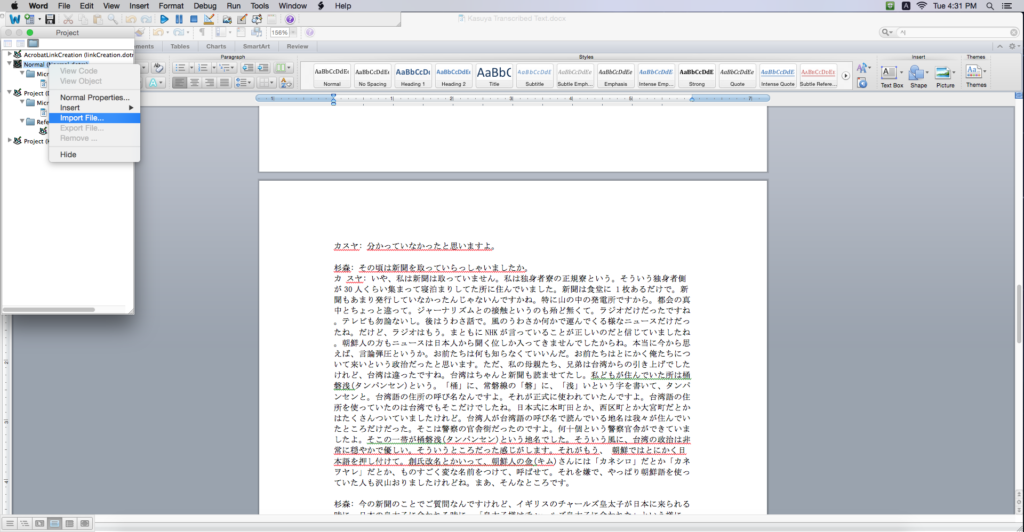
- Right click “Normal (Normal.dotm),” then select “Import File…”
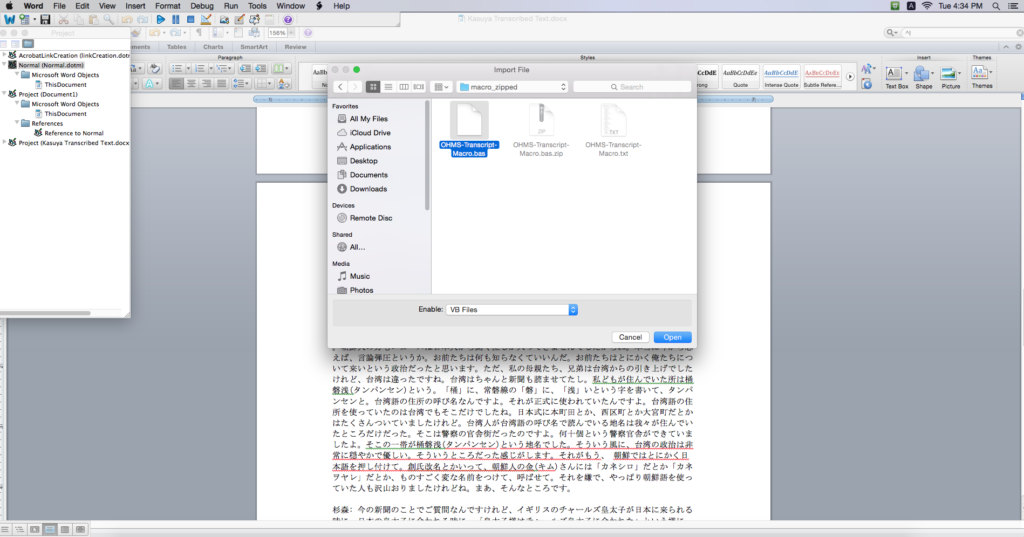
- Under “Downloads,” (or wherever you saved the macro to) double click the folder “macro_zipped,” then double click “OHMS-Transcript-Macro.bas”
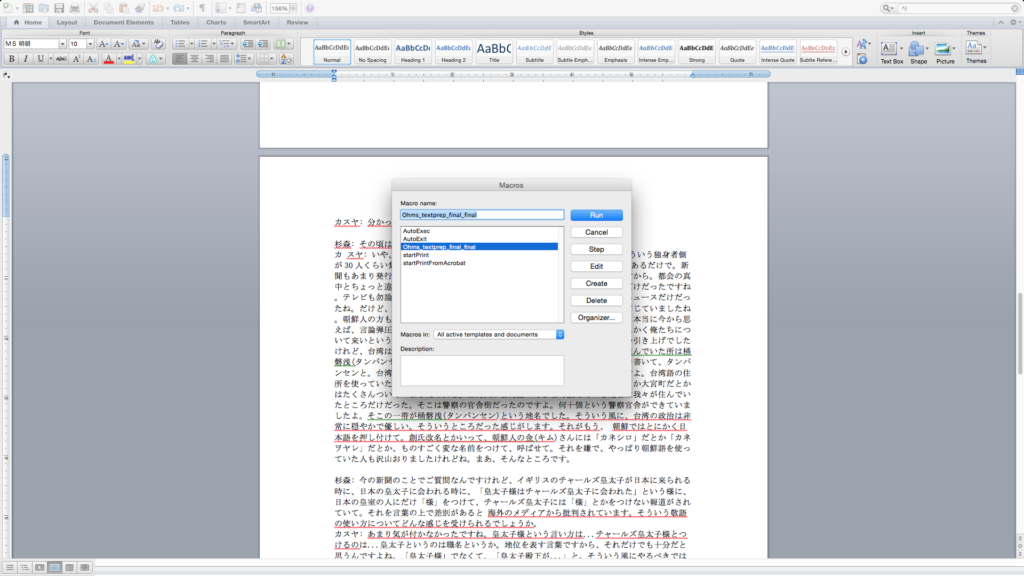
- Select “Tools,” “Macro,” “Macros…”

- Select “Ohms_textprep_final_final” and click “Run”
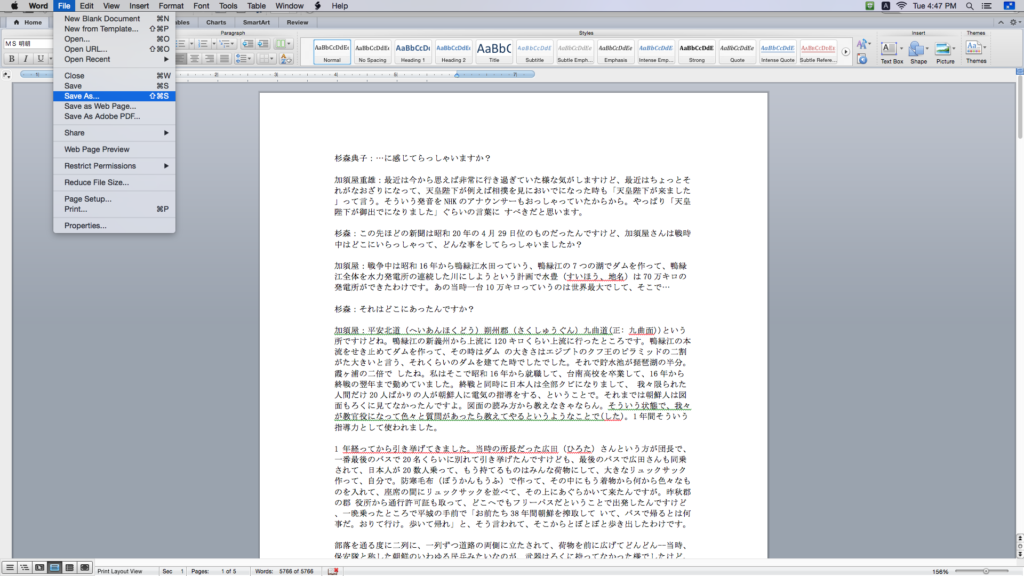
Save the formatted document as a Plain Text file.
- Select “File,” “Save As…”
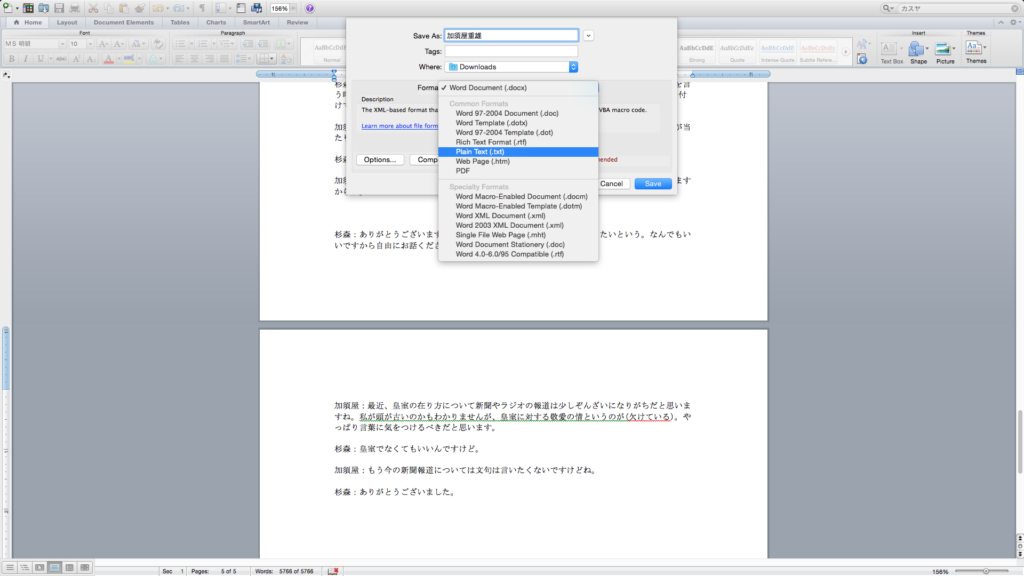
- Enter appropriate file name and location, then select “Plain Text (.txt)” from “Format.” Click “Save.”
- Select “Other encoding” and “Unicode 6.3 UTF-8.” Also select “CR/LF.” Click “OK”

- Make this document available for later use to avoid having to perform all prior formatting steps when making modifications on the uploaded transcript. Save your document as a Microsoft word file as well if you would like to make edits to it later without needing to format it again.
Upload the Plain Text file to OHMS
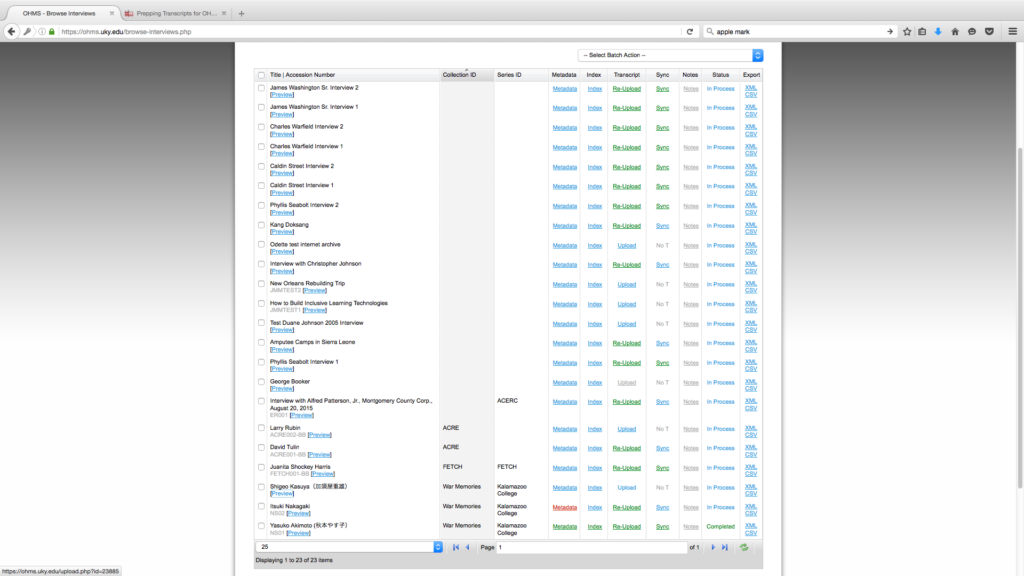
- Go to the OHMS Interview Manager. Find the interview for which the transcript was written under the column “Transcript” click “Upload”
- Click “Browse” for either transcript or translation. Find and select the Plain Text file formatted for OHMS. If you are using transcripts for two languages put the original language transcript under “file” and the translated language transcript under “translated transcript.” Click “Save.”
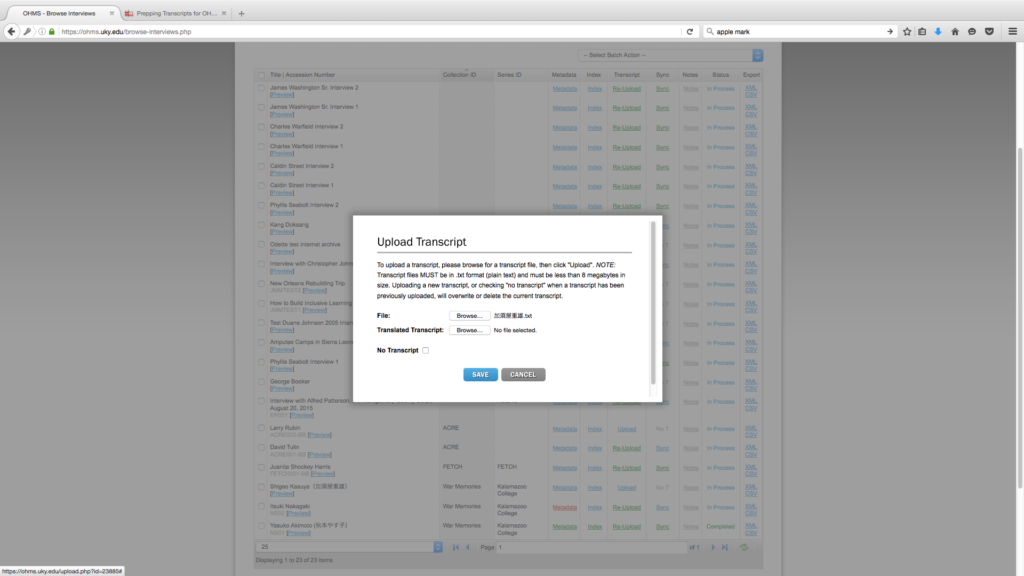
- If the upload was successful then the upload button will now be green and say “Re-Upload.” If it stays blue that means there was an error somewhere in your document formatting and you should go back through this guide to make sure you followed it exactly.
That’s it! Your file is now ready for synchronization. For information on how to enable the new bilingual function in OHMS for syncing transcripts in two languages click here.


sakina | March 7, 2017
|
This was extremely helpful. Thank you for the resource.